
Christmas is really a very special and amazing holiday to be celebrated with people who are special to you. It is the time where we try to think of the best presents to give them. And what better Christmas gift to give them than something that you created with your own hands? You can give them something as simple as homemade Christmas cards or go through the lengths of creating amazing handicrafts. Here are some ideas you can choose to do:
DIY Gift Ideas:
For Women:
Fabulous Watch Strap


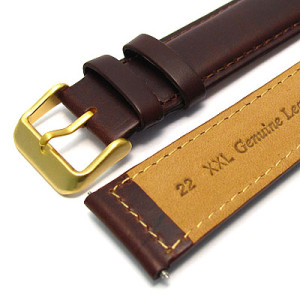 Women are often attractive to stylish accessories. If you’re going to give a gift to a woman who loves watches, this DIY watchstrap is a good way to go!
To start off, get an idea on certain details—like what kind of fabric she likes and what her favorite color is. (If you don’t know such details, the best fabric to start with is cotton lawn.) Once you get these details, you can start your strap.
- Get your fabric and cut it into a rectangular shape, around 45 cm by 12 cm.
- Fold this fabric in half (lengthwise). Make sure the right sides of the fabric are together. Stitch along these sides and make sure that you give at least 1 cm allowance along the seam, as well as diagonally across the ends. On the center of the strap, make sure you leave a gap to leave space for the turning through.
- Trim the seam with an allowance of 5mm, turn it through and sew the gap close.
- Insert the newly sewn watchstrap through the watch and there you have it.
Tip:Don’t forget to check if the watch you’re going to use has a gap that is wide enough for the strap you just made. You can buy inexpensive watches from the local market and replace its strap with your handcrafted one.
Apron
Women love whipping up a storm in the kitchen. This Christmas, make cooking more fun by giving a homemade apron you’ve sewn yourself.
- Choose a fabric you think the recipient might like. Get it around 90-115cm (or wider).
- Draw an outline of an apron onto the cloth. Once satisfied with the outline, cut it out.
- Also cut strips of the fabric. (Two 80×6 cm for the ribbons on the waist, One 60x6cm for the neck strap, One rectangle 30x33cm for the apron’s pocket)
- Turn over the pocket piece and sew across its wider edge a 2cm hem.
- Fold the bottom sides (around 1cm) under itself and stitch it on the center of the apron, around 27cm above its lower edge.
- Stitch on the waist ties and neck strap to finish the apron. Make sure to tie them in a secure manner.
For Men:
Personalized Mug
Mugs will be perfect for men who are always busy bees at work. Jazz up his morning work coffee with a personalized mug with his initial.
- Choose a plain mug with his favorite color. To be sure, a white mug is perfect to start with.
- Outline the initial onto the mug with the use of a pencil.
- Grab a paintbrush and fill its tip with a paint color of your choice. Get enough paint to just paint on a dot on the outline so you can make a polka dot design.
- Just a tip, keep the dots fairly small so you can avoid paint from dripping. You can also place the mug down and on one side so it can dry easily.
- Suggestion: Pebeo Porcelain waterbased paint works best. You can try mixing different colors to get the one you want.
- When the paint dries, bake it inside the oven so it can cling on to the mug and make it dishwasher resistant. (Oven around 130ºC and in for around 35 minutes)
For Kids:
Homemade Snow Globes
Kids usually enjoy colorful and quirky gifts. Give them something they can enjoy as well as appreciate like homemade snow globes.
- First step is to gather your materials. You will be needing:
- Medium to Large glass jars (Like from baby food) or any jar as long as it has a lid (make sure to thoroughly wash it)
- Modeling clay or Florist clay
- Small figurine of your choice (preferably Christmas themed)
- Glitters (preferably white or silver or you can trade glitters for fake snow)
- Glue gun
- Optional: Felt paper or ribbon
- Attach your figurine to the lid with the use of your clay. You can choose to clump the clay underneath the figurine to make it appear taller, especially if your figurine is quite small. You can attach any other object to the clay base for added scenery (ex. Felt grass). Use your creative juices and imagination for this! Just make sure that whatever you put in as design is waterproof.
- Fill your jar with cold water, but not all the way. Make sure to give allowance of around ½ inch of the top. Sprinkle around a half-teaspoon of white/silver glitter or fake snow. Adjust the amount of glitter accordingly.
- Warm up the glue gun and afterwards, line the inside of your jar lid with the hot glue. Immerse the figurine inside the jar and screw on the lid.
- Dry the jar in case any water spilled. After screwing in on the lid, make sure to apply another layer of the glue around its rim to seal it shut.
- Let your handicraft dry overnight and make sure that it stands on its bottom, and not on it’s lid.
- You can choose to decorate the rim of the lid but it is optional. A suggestion for the rim design is by tying a ribbon around it and securing it with glue. You can also choose to attach decorative holly berries to add a holiday feel to it. You can also choose to cut out colored felt and glue it on the lid. The possibilities are endless! Just make sure you do not limit your imagination and surely, any kid who gets this fun homemade snow globe will go crazy.
For All Ages:
Homemade Notecards:


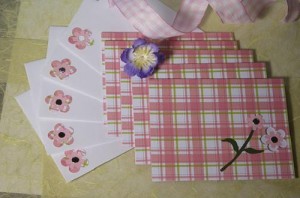 Anyone, no matter what age or gender, will definitely appreciate a set of notecards for them to use. It’s a thoughtful gift, as well as easy to do!
image:kcmunda.wordpress.com
- Get any printed fabrics of your choice. Cut it out into tiny triangles.
- Using a lead pencil, draw your guide for designing onto a blank white paper card (fold according to your liking) .
- May be you can add Christmas messages on to it
- Lay down the fabric cutouts onto your guide and glue them on. Secure the decorations further by sewing it onto the card using a sewing machine, or even by hand.
- Create four of these pretty cards and tie them up to make a gift pack. Add the finishing touch by using a beautiful ribbon.