


 When Halloween comes, almost every child enjoys the celebration and has fun with friends and family members. On the occasion of Halloween, children wear various types of Halloween masks and look for the appreciation and sweets as the gift of their fancy clothes.
This further means that for kids, Halloween masks play important role when it comes to enjoying the celebration.
Although several types of Halloween masks are sold in the market during the Halloween season, many people prefer preparing the masks on their own for their kids. The reason behind this can be that they might not want their kids to wear something that may harm their tender skins due to some improper materials used to prepare the masks.
If you are among those parents who really care for their tender skin and hygiene, you are going to love this section.
In this entire discussion you will learn how to prepare Halloween masks right at your homes using just a few scrapes or unused papers. While the instructions given below, you might be required to purchase a few mandatory things such as a glue gun or glue stick, an elastic cord, or some colored felts. However when it comes to your child’s safety, these minor elements really don’t matter much.
This tutorial tells you the creation process of three Halloween masks namely:
- Bull’s Eye Dress
- Facebook Mask
- One-Eyed Monster Mask
- Silicone Halloween Mask
Here’s what you need and what you need to do:
1. Bull’s Eye Dress:
An easy duct-tape design stick to a black shirt makes you the center of attraction in the Halloween party; score more with an add-on of arrow hat. To prepare this mask, you need:
- Duct tape: red, black, blue, and white colored
- Parchment paper
- Plates, bowls, and glasses of assorted sizes
- Black sweatshirt and pants
- Wire cutters
- Wire hanger
- 2 plastic straws
How to Prepare a Bull’s Eye Dress?
Preparing Bull’s Eye:
I. Take a sheet of parchment paper; cover an area just bigger than a dinner plate: of about 11 inches diameter, by sticking adjoining white duct tape strips. Trace the plate.
II. Repeat the same step by tracing three concentric circles of increasing diameter with blue, red and black tape accordingly (may use 8 -6 inch dia. Bowl and a 4 inch glass).
III. Cut all the traced circles. Remove the tapes from the parchment and stick them on top of each other. Make sure the circles are concentric to make the target design. Stick this to the shirt’s front
The Arrow:
- Cut the wire hanger at the straight bottom segment, using the wire cutter.
- Bend it to form an arch that fits your head.
- Cut about 1 inch of each straw at one end.
- Place any one end of each of the trimmed straws between the two duct tape squares.
- Cut the duct tape to give it the shape of an arrow with a point.
- Slip the placed straws over the wire edges.
- Place some additional duct tapes to give them a firm grip.
2. Facebook mask:
Facebook mask, which is quite a friendly costume, would encourage your friends and relatives to get one for their own selves, finally envying you. In order to prepare a Facebook mask for the Halloween night, you need:
- A glue stick.
- A piece of thin elastic.
- A duct tape.
- Wrapping paper.
- White paper.
- 12-15 oz. of cereal box.
- 1 marker.
- 1 baseball cap.
How to Prepare a Facebook Mask?
Preparing Book Cover:
- Take the cereal box and cut off the top and bottom flaps of the box. Also, cut one side (panel) of the box. This would give you a box that is opened from one side.
- Apply some glue from the glue stick on the entire printed side of the three-sided cereal box.
- Cut the wrapping paper about an inch larger to the size of the box.
- Paste the trimmed paper on the printed side of the cereal box, where you applied the glue.
- Now fold the extra wrapper to the back of the cereal box and apply glue to paste it there.
- Once this is done, paste the white paper of around 11×17 inches on the top of the wrapping paper.
Preparing Inside Pages:
- Take two sheets of white papers of 11×17 size.
- Accordion fold the papers keeping the folds of around 1 inch wide.
- Apply glue on each short-end of the accordion-folded white paper and stick them to form a table shaped structure out of them.
- Apply glue to the corner edges of the accordion-folded sheets and stick them to the corner edges of the book cover created earlier, leaving the center of the accordion-folded sheets lose from the middle.
Preparing Face Opening:
- Place the wrapped cereal box straight on the floor keeping its wrapped side facing towards the roof.
- Use the marker to draw an oval shape at the center of the box.
- Get the knife and cut the oval-shaped piece out of the box, leaving an opening in the center. (Make sure this step is performed under an adult’s supervision, or is being done by an adult itself).
Preparing Neck Strap:
Use the thin elastic and attach it under the white sheet of paper using the duct tape.
Preparing Hat Attachment:
- Remove the bill that is (if it is) attached to the baseball cap.
- Use the duct tape to attach the front portion of the baseball cap to the book prepared earlier. Attach the front of the cap in such a way that the strip of the duct tape runs down to the center of the front of the cap to the top of the book, just above the opening of the face.
- Keep placing the duct tape over the edges of the book cover and taking it down the paper, pasting it through the opening of the face, and finally finishing the pasting by passing it through the cap’s center.
Finalizing the Mask Preparation:
- Use the glue to attach the middle of the book page with the cover.
- Finally use the marker and write “Face Book” (without quotes) on the mask.
- Wear the mask and impress others.
3. One-Eyed Monster Mask
The One-Eyed Monster Mask is one of the easiest Halloween masks to prepare at homes. The mask can be created using some scraps scattered around in a normal house, and it takes not more than 15-20 minutes to prepare it.
In all, it can be said that the One-Eyed Monster Mask is the last minute mask that you can create to make your kids happy and make them enjoy the celebration of the Halloween Day.
To prepare a One-Eyed Monster Mask, all you need is:
- A glue gun.
- An elastic cord.
- A pair of scissors.
- Green felt.
- Black felt (or Dark Brown felt).
- White felt.
- Blue felt.
Preparing One-Eyed Monster Mask:
- Take the Green felt and cut it in a rectangular shape.
- Make sure that the piece of Green felt that you cut is long enough that it reaches from one ear of your child to the other when placed on the forehead.
- Also ensure that the width of the felt is long enough to end just above the lips of your child when placed on the forehead.
- Use the marker to draw two curved lines joined together in the form of two hills with their peaks facing downwards. This way you will cut the Green felt leaving the space for your kid’s nose.
- Once done, grab the White felt and draw and cut a large circle of the felt (not large enough to exceed the width of the Green felt).
- Place the White circle in the middle of the Green felt using the glue gun.
- Then cut the Blue felt in comparatively smaller circle, and place it on the top of the White circle.
- Cut even the smaller circle from the Black or Dark Brown felt, and place it on the top of the Blue circle forming the structure of the entire eye of the monster.
- After this, grab the remains of the Green felt and cut a half-moon shaped piece from it.
- Place the half-moon piece on the top of the White circle to create the eyelid of the monster.
- Once this is done, place and hold the mask on your kid’s face, and using a marker, carefully draw the small circles on the mask where your kid’s eyes would be positioned after wearing the mask.
- Take the mask off your kid’s face.
- Use the scissors to carefully cut the mask from the places where you have drawn the circles for the kid’s eyes, ultimately making the two holes on the mask.
- Make small holes on the each horizontal edge of the mask.
- Tie each end of the elastic cord to the holes at the horizontal edges of the mask.
- Finally check and verify if every knots and glued pieces are in proper place and are fixed firmly.
- Present the One-Eyed Monster Mask to your kid and celebrate Halloween with your family.
4. Silicone Halloween Mask

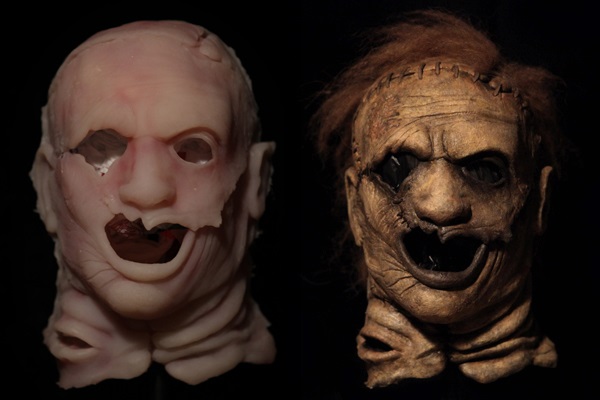
Silicone Halloween Mask looks like it took several weeks to prepare it, but with the instructions given below, you can easily create it in just a few hours. Although you need a bit more than a few things as raw materials before you start preparing the mask, the materials can be arranged quite easily if you go the nearest market.
Here’s what you need as raw materials to prepare your own Silicone Halloween Mask:
- A Styrofoam wig head.
- A large length of stretchable fabric (e.g. spandex).
- A baseboard.
- A few paint brushes (disposable ones are recommended).
- Mixing containers with measurement marks.
- A glue gun.
- A pair of scissors.
- A few mixing sticks.
- Silc-Pig Pigments.
- Dragon Skin Fast silicone.
- Thi-Vex silicone thickener.
Preparing Silicone Halloween Mask
- Cut the stretchable fabric to 12”x5” of length.
- Grab the wig head and place it on the baseboard.
- Using the hot glue gun, stick the wig head to the baseboard.
- Mix the Dragon Silk Fast in the ratio of 1A:1B.
- Add the Silc-Pig BLOOD.
- Grab a thin paint brush and paint a thin layer of mixture on the wig head. (Make sure you leave some area at the back of the head for the stretchable fabric.)
- Wait for a few minutes till the silicone starts getting dry, and place the 12”x5” fabric over the area of the wig head that you left intact.
- Wait for around 70-80 minutes to let the silicone get completely dry.
- Mix some Dragon Skin Fast with the Silc-Pig BLOOD.
- Add some drops of Thi-Vex to the mixture.
- Using the edges of the fabric as the marking lines, apply some silicone to the wig head.
- Create the remaining mixture to design the detailed shape of the face.
- Wait for another 70-80 to allow the second layer get completely dry.
- Using Silc-Pig pigments, create another thin layer over the wig head and leave it alone for another hour or so to allow it to get cure.
- Once done, apply the Dragon Skin Fast on the wig head as the final layer to work as its skin.
- Create shadows and zombie blood using some Dragon Skin Fast and Silc-Pig Black pigments.
- Leave the entire mask for around 70-80 to let it get completely dry.
- Detach the mask from the wig head by cutting it from the bottom using a sharp knife.
- Turn the mask inside out and make holes for the eyes and nose.
- Wear the mask and apply some additional makeup under the eyes to make it look realistic.
Conclusion
All the above discussed instructions to create Halloween Masks are purely harmless and hygienic. Although the entire process of creating such masks may be time consuming, they give your kids and models a realistic look when worn on Halloween.